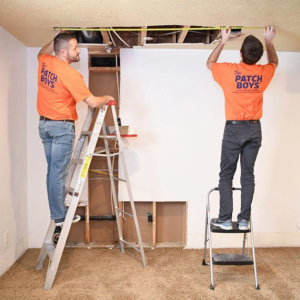
Every home experiences damage over time, and ceilings are no exception. Cracks, stains, and sagging are common in older homes, but prompt attention can minimize the problem and repair costs. Contact Ceiling Repair Perth now!
A spackle or joint compound can repair small cracks and water stains. Using the proper materials helps ensure the results look natural.
If you see cracks in your ceiling, it can be scary. However, it’s important to take the time to assess whether it’s a serious structural problem or just some minor cosmetic damage. If you don’t, you could lose sleep over something that isn’t a threat to your home or business. Getting a professional assessment when you see cracks in your ceiling can help you determine the best solution and prevent future damage.
Generally speaking, hairline cracks on your ceiling aren’t anything to worry about. They’re usually caused by the shift in the structure and are not as serious as a crack that runs from wall to wall or up a wall. This type of crack is common in older homes and it’s simply the result of the house settling as it ages. Moisture problems, such as plumbing leaks, are also a common cause of ceiling cracks. These can be particularly destructive to drywall, leading to deterioration and mold growth.
Another reason for cracks in the ceiling is that they can be caused by something heavy on the floor above, like a piano or heavy bathtub. These types of cracks are typically referred to as “spiderweb” cracks and are fairly common. These aren’t usually a sign of structural damage, but you should still call a builder to check the issue and make sure that the trusses in the roof and ceiling are secure.
Larger cracks in the center of your ceiling, particularly if accompanied by sagging, are an indication that you have structural damage and should be looked at right away. These cracks can indicate a number of issues, including water damage, foundation settlement or something heavy on the ceiling that isn’t strong enough to support it.
A crack between your wall and ceiling is a clear indication of structural damage. This type of crack can be very dangerous and should be assessed by a professional. Depending on the cause, a repair may be simple or may require the entire ceiling to be replaced.
Water Stains
Water stains on your ceiling aren’t just unsightly, they’re also a sign of a bigger problem. Left untreated, they can lead to mold or mildew, ruining personal belongings and posing health risks for you and your family. Water damage to your ceiling is often caused by leaky roofs or faulty plumbing, and it requires immediate attention.
Water staining is a common problem and may appear as pale patches or discolored rings on your ceiling surface. These stains appear as the moisture in your ceiling material dries and leaves behind mineral deposits. These stains are usually visible when you look up at your ceiling, but they can also show up in areas that are exposed to high humidity or have poor ventilation.
The first step in addressing water stains is to locate and address the source of the moisture. This can be challenging because the leaks are hidden between layers of your home’s ceiling. In order to identify the source of the water, you’ll need to open up and inspect your attic or crawl space. If the stain appears near a vent, chimney, skylight, or dormer, it’s likely coming from there.
Once the source of the water is fixed, you can then begin the process of repairing the ceiling. This is done by cleaning the affected area and treating it with a water-resistant primer. Once the affected area is dry, you can repaint your ceiling with a color that matches the rest of your home. Be sure to use a stain-blocking paint designed for ceilings so that your new paint won’t bleed through the old stain.
Acknowledging a water stain on your ceiling and taking appropriate action is important in order to prevent structural damage, weakening of seals, or even electrical failure in your home. You can also prevent water stains by routinely inspecting your property for any potential issues and implementing moisture control methods such as exhaust fans and dehumidifiers in high – humidity areas.
Drywall Repair
Drywall repair can be a DIY project, but it’s often best to leave this and other types of home improvement projects to professionals who have the tools and expertise to ensure quality results. This is particularly important when it comes to drywall repair because ceilings are more difficult to work on than other walls.
Fortunately, if the drywall is damaged in an area that’s easy to access (like above a dropped ceiling), it’s not impossible for you or a painting service to handle a simple patching job. Small holes and dents can be repaired with a drywall patch kit that includes everything you need, including a putty knife, sandpaper, and joint compound or spackle.
Before you begin, make sure the area is clear and that there aren’t any pipes or wires in the vicinity of the damage. You’ll also want to use a stud finder to mark where the joists are so you don’t cut into them or any electrical wiring. Once you’ve marked the areas where you plan to cut, remove the old drywall and trim any stray edges with a utility knife. Once the area is clean, you’ll be ready to install a new sheet of drywall.
When the new drywall is installed, apply a strip of self-adhering mesh tape along the edge where it meets the existing drywall. This will help prevent future problems like loosening and cracking. Then, apply a thin layer of joint compound with your putty knife, covering the entire patch and using a crisscross pattern to ensure complete coverage. When the mud is dry, you can sand the patched area and feather the edges to blend the repaired wall with the rest of the ceiling.
If the area isn’t easily accessible, you may need to go into the attic (or somewhere else where there’s a space above the damaged wall) and push out any insulation before you can get to the hole to make the repairs. It’s a messy job, but the lost insulation can be replaced by either putting down new blown-in insulation or adding a bag of loose fill insulation to the area before you start patching.
Replacement
Over time, every home faces some form of wear and tear, including ceiling damage. Whether sagging, water-damaged or discoloured, these issues often require professional attention and repair to prevent serious structural problems. If left unattended, they may even lead to collapse or unsafe living conditions.
Cracks and water damage on a ceiling are clear signs that the material is deteriorating and that it’s time to replace it. If a homeowner spots such issues, they should contact a qualified contractor right away to prevent more damage and health risks.
Ceilings can also experience environmental stressors, such as extreme temperature fluctuations and high humidity levels. These factors can cause materials to age faster, resulting in surface damage such as plaster cracks and stains. Regular maintenance and inspections, such as painting and surface cleaning can help to slow down this aging process.
Sagging ceilings and drooping arches are a serious safety concern, and may indicate the need to replace a supporting beam. This is a complex job that requires the skill of an experienced professional.
Depending on the extent of the issue, the total cost of replacing a ceiling can vary greatly. A variety of factors are taken into account, including local labor and permit costs, as well as the cost of materials. The location of the house will also play a role in the final cost.
When selecting a company to do a ceiling replacement, homeowners should ask about their level of expertise and past work. They should also inquire about pricing and any guarantees offered. It’s recommended to choose a professional that is licensed, insured and has been in business for more than 5 years.
For a quick, affordable fix, a DIY-er can opt for the Gyprock 530 x 530 x 10mm Mini Plaster Repair Panel, Buildex 6-18 x 30mm Zinc Plated Bugle Head Plasterboard Screws 100 Pk, Flexovit 100mm x 20m 120 Grit Timber Sandpaper Roll and a piece of 42 x 19mm x 1.8m Premium Grade Dressed Pine. However, it’s always better to leave the task to a professional to ensure quality and safety.